Confused about how to file, view, preview, and print W – 2 and W – 3 forms? Do not worry, we have got you covered. In this blog, we will see proper and detailed steps to do filing, viewing, and Print Your W-2 and W-3 Forms in QuickBooks in the application of QuickBooks. Keep reading this blog till the end to understand everything about these forms in detail. The full form of these forms is “Wage and Tax Statement.” The W-2 form contains information about wages and salaries, along with the federal, state, and other taxes that were withheld. Whereas, the W – 3 form is used to summarize the total earnings and withholdings that were filed on the W – 2 form.
How to Set up, Create, and File Your W – 2 Forms in QBDT Enhanced?
In this section, we will see the steps to file the W – 2 forms in the QuickBooks Desktop Enhanced version. Before proceeding with the steps, please keep the following things in mind.
Please Remember
If you file your W-2s and the W- 3 forms electronically using the application of QuickBooks, you would not need to file them with the Electronic Federal Tax Payment System (EFTPS).
The last date to file W – 2 forms, electronically, using the application of QuickBooks is 30 January.
Now, let us begin with the steps to set up, create, and send the W -2 forms, one by one. The steps are as follows-
Steps for Setting up the W – 2 Forms electronically
The steps for setting up the W – 2 forms e- filing procedure, in QuickBooks Desktop Enhanced are as follows-
- Open QuickBooks.
- Now, go to Employees, then click Payroll Center.
- Furthermore, open the QuickBooks Desktop Payroll Setup.
- In the QuickBooks Desktop Payroll Setup, go to the File Forms tab.
- In the File Forms tab, choose the Other Activities list at the bottom, and furthermore, go to the Change Filing Method.
- Now, click on Continue.
- Now, select the Federal Form W-2/W-3 forms from the list of forms and then click on Edit.
- Now, go to E-file and then go to the Finish option. Now, the enrolment instructions will pop up on your screen. Make sure to go through the instructions.
- Now, close the View Enrolments window and then click on Finish Later.
Steps for creating W – 2 forms
The steps for creating the W – 2 forms in QuickBooks Desktop Enhanced are as follows-
- Open QuickBooks.
- Now, go to Employees, then go to Payroll Tax Forms and W-2s.
- Now, go to Process Payroll Forms.
- In the File Forms section, select the option Annual Form W-2/W-3 – Wage and Tax Statement/Transmittal and then select the option Create form.
Steps for sending the W -2 forms
The steps for sending the W – 2 forms in QuickBooks Desktop Enhanced are as follows-
- Open QuickBooks.
- Now, hover over the option Process W-2s, then go to All Employees, to file forms by batch.
- Now, go to the option Select Filing Period, enter the year of the form you’re filing, and select OK.
- Now, go to the Select Employees for Form W-2/W-3 window, select the employees. You can also select Mark All to select all employees displayed.
- Now, go to E-File Federal Forms.
- Enter your business phone number and email address.
- Select Submit.
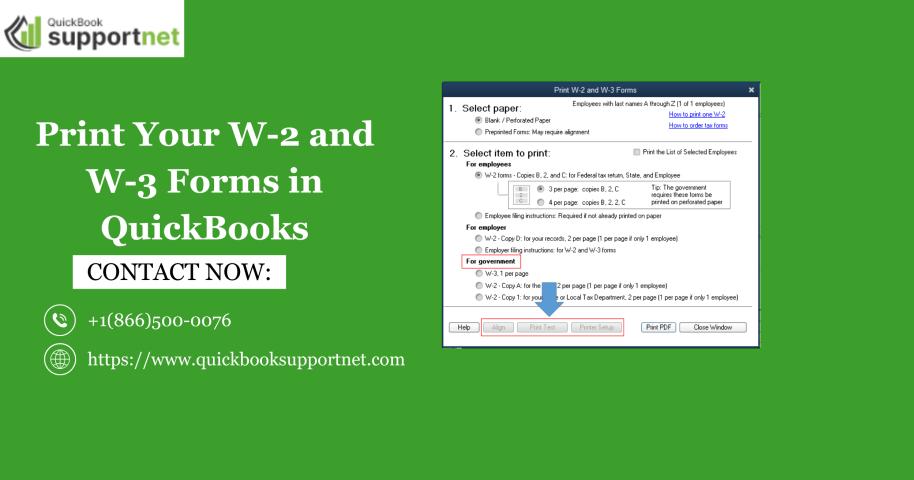
Steps For Printing W – 2 Forms
Before we see the steps to print the W – 2 forms, make sure that you follow the paper requirements that are listed below. The paper requirements are as follows-
W-2 paper requirements
Before you print, make sure you have the correct paper type.
Plain paper: Use plain paper if your employee has lost their original W-2 forms, or even if they want a copy to keep as a record.
Perforated paper: Make sure to purchase this paper if you are directly printing it from QuickBooks to mail official copies to your employees.
Please note – You can only print your W – 2 forms after 1 January.
Now, let us see the steps to print the W–2 forms. The steps are as follows-
- Firstly, make sure to update your QuickBooks application and payroll tax table.
- Now, go to Employees, then go to Payroll Tax Forms and W-2s.
- Now, go to Process Payroll Forms.
- In the File Forms section, select the option Annual Form W-2/W-3 – Wage and Tax Statement/Transmittal and then select the option Create form.
- Select the employee for whom you want to file the form.
- Now, enter the year and click on OK.
- Select the employee for whom you want to print the form.
- Now, click on Review/Edit to review each of the W-2 forms and mark them as Reviewed.
- Now, finally, click on Submit Form.
How to File State W – 2 Forms?
In this section, we will see how to file the W – 2 forms for the state. The first step is to create those forms; secondly, you would have to go to the state agency website and upload them there.
In this table, we have listed the states that have to follow the steps below to create and file a W -2 form.
|
Alabama |
Iowa |
Minnesota |
Pennsylvania |
|
Arizona |
Kansas |
Mississippi |
Rhode Island |
|
Arkansas |
Kentucky |
Missouri |
South Carolina |
|
Colorado |
Louisiana |
Nebraska |
Vermont |
|
Connecticut |
Maine |
New Mexico |
West Virginia |
|
Delaware |
Maryland |
Ohio |
|
|
District of Columbia |
Massachusetts |
Oklahoma |
|
|
Idaho |
Michigan |
Oregon |
Step 1 – Creation of the W – 2 State forms
The steps for creating the W – 2 forms for the state are as follows-
- Open QuickBooks.
- Go to Employees, then navigate to Payroll Tax Forms & W-2s, and then go to create State W-2 E-file.
- Click Continue two times.
- Furthermore, select your state from the drop-down menu and then go to Get QuickBooks Data.
- Click on OK. Please ensure that you check that the information you have filled in is correct.
- Now, go to the Add-Ins tab and then select QuickBooks Payroll State W-2 from the drop-down menu and select the option Start Interview.
- Now, check the box. I understand that I must review my data and answer the following questions. Then choose the option Next.
- Note the name of the file and the location as well. Furthermore, click on Next.
- Now, you have to answer the questions asked in the interview carefully and review any auto-populated info.
- Now, keep clicking on Next until you have reached to the prompt on your computer screen shows End of Interview.
- Now, choose the option Create W-2 File and then click on OK.
- Now, click on Yes to save the Excel workbook for your records.
|
Georgia |
Indiana |
North Carolina |
Wisconsin |
|
Hawaii |
Montana |
Utah |
|
|
Illinois |
New Jersey |
Virginia |
If you live in any of the states that are given in the list above, you are eligible to E – file your W-2s via the QuickBooks application. Just follow the steps below to file your W – 2 forms electronically via the QuickBooks application. The steps are as follows-
- Open QuickBooks.
- Go to Employees, then navigate to Payroll Tax Forms & W-2s, and then go to create State W-2 E-file.
- Now, go to the File Forms section, and select your state worksheet.
- Make sure to check the Select Filing Period year, and you can change it if that is required.
- After doing so, click on OK.
- Furthermore, fill in the W-2 worksheet and select the option Check for errors to ensure that everything is right before you are done with E – filing.
- When you have rectified all the errors, click on E – File.
- Fill in your email address and mobile number, and then click on Submit.
Note: If you live in Hawaii, it is mandatory for you to mail your W – 2 forms to the state.
If you are living in California or New York state, you do not need to file your W-2 form separately. It is itself included in the Federal W-2 file.
If you live in any of the states listed below, you do not have to file a W-2 form with the state, as it does not have any state withholding tax.
|
Alaska |
New Hampshire |
Texas |
|
Florida |
South Dakota |
Washington |
|
Nevada |
Tennessee |
Wyoming |
Step 2 – Open your State Agency Website and upload your files there
Open your preferred web browser and then search for your state agency website. When you land on the website, follow the instructions to upload those files to the website. Make sure that you meet the specific requirements of your state, to upload them on the website, or else they will not get uploaded.
How to File and Print the W – 3 Forms?
Keep the following things in mind if you want to file the W – 3 forms. The things are as follows-
- You do not have to file Form W-3 if QuickBooks files the W-2s forms for you, or if you file them electronically through QuickBooks.
- If you send a copy of the W – 2 form to SSA, file the W-3 Form along with the W-2 copy A.
- And, if you are willing to print these forms, follow the same printing steps as the W – 2 forms.
In a Nutshell
This is all for this blog. We have covered how to file and print the W – 2 and the W – 3 forms in a detailed and simple way. In case of any queries, feel free to call our experts +1-866-500-0076 to get in touch with them and get your queries resolved.
Read More: Learn Everything About QuickBooks Error 6190 in Detail