Good lighting can enhance the safety and aesthetics together effortlessly. The car's LED lights are one on top when you want to go with the trend. This exterior accessories modification will enhance the look of the car by 30-40 times with minimum investment. One thing is best above all is installing them yourself is easier than you can imagine.
From selecting the appropriate lights to installing them securely, this installation guide will help you understand clearly. With Drivestylish, you can shop the LED lights for your car and learn about the installation process in this blog:
Why LED Lights are Crucial for Car Exteriors?
LED lights for car exteriors have become new safety accessories that enhance the efficiency and beauty of any car model. You can consider the most crucial reasons to invest in these accessories:
1. Low power usage and enhances the fuel efficiency: Car headlights run on 12V power and also enhance the fuel efficiency by improving visibility.
2. Improved Visibility: LED lights provide brighter and more concentrated light. These are ideal for bad weather, as the red LED light does not scatter in fog and storms.
3.Instant On and off: The LED headlights turn off and off within seconds. You can fully control these lights, and the top model headlights are automatic too.
4.Long Lifespan: Standard LED lights have a lifespan of 20,000 to 50,000 hours. Minimises the frequency of replacement, reducing costs for maintenance.
5.Compact & Stylish Design: LED devices are compact, enabling car designers to design Slower taillights, slimmer headlights. Iconic DRLs (Daytime Running Lights)
6.More Colour Control: LEDs can be made to emit light in a variety of colours without the use of filters. Highly customisable for custom accents, ambient lighting, and customised for any model of car.
Tools and Materials You’ll Need to Install the Car Exterior LED Light
Having the right tools on hand will make the installation process smoother and safer. Here's what you'll need:
Customised LED light Kit for Car || Screwdrivers: To remove the headlight housing || Gloves: To protect the bulb and Hands || Socket Wrench: To tighten the Bolts and Clamps || Cleaner Liquid and Microfibre Cloth
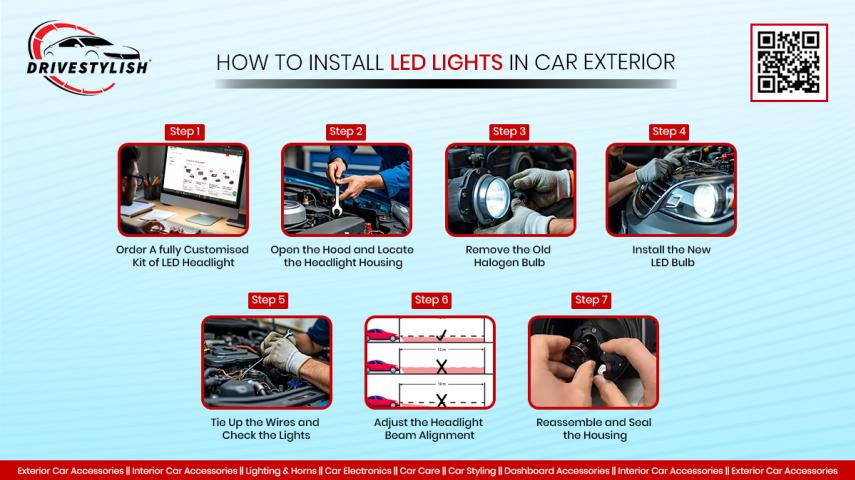
Step-by-Step Guide: How to Install LED Headlights on Your Car Exterior
At Drivestylish, we go through two-tier testing of LED lights with a 12V source to ensure all LEDs function properly. So, no defective pieces are delivered. Following are the detailed steps on what to do after you get your package-
Step 1: Order A fully Customised Kit of LED Headlight
Make sure you know the right fit and type of car bulb among commonly labelled as H4, H7, H11, etc. This info is written on an existing bulb. Make sure to purchase an LED kit that matches this specification and is CAN bus compatible to prevent dashboard warning errors.
Step 2: Open the Hood and Locate the Headlight Housing
For a safer installation, turn off the engine and unplug the battery first. Now find the rear of the headlight assembly by opening the hood. To get to the lightbulb, you might have to unclip a plastic housing or take off a rubber dust cover.
Step 3: Remove the Old Halogen Bulb
Pull the halogen lightbulb out of the socket after carefully rotating it clockwise. Next, unhook the clip or press the release tab to disconnect the wiring harness. To prevent oil or dirt transfer, which can shorten bulb life, handle the bulb by its base rather than its glass.
Step 4: Install the New LED Bulb
The LED bulb has to be put into the factory harness. Make sure the driver or cooling fan that comes with your LED will fit tightly inside or around the headlight enclosure. After installing the bulb, turn it to secure it. To emit the correct beam pattern, make sure the LED chips are positioned sideways between 3 and 9 o'clock.
Step 5: Tie Up the Wires and Check the Lights
To prevent vibrating and disruption, secure any loose ends with electrical tape or zip ties after the LED bulb has been installed. Turn on the headlights and reconnect the vehicle's battery. Verify that the low and high beams are operating properly. Verify the connections and polarity again if neither light illuminates.
Step 6: Adjust the Headlight Beam Alignment
For safe driving and to avoid glaring at oncoming traffic, headlight alignment is essential. Park your vehicle 10 to 15 feet away from a wall on a level surface. Observe the beam pattern after turning on the headlights.
Step 7: Reassemble and Seal the Housing
Replace any dust caps or covers that were taken off after everything is operational and properly aligned. Make sure the headlight housing is sealed to keep out moisture and dust, and double-check that all the connections are tight. Make sure the lighting is clear, focused, and road-legal by taking a quick nighttime test drive.
Final Thoughts
Installing LED headlights onto your vehicle is a straightforward DIY operation that can change safety and >
Need suggestions for the best LED kits in India or model-specific tutorials? Throw in your car model in the comments, and we'll assist you!