
Customers want more than fast shipping—they want real-time, detailed order updates. Shopify’s default order statuses (Unfulfilled, Fulfilled, and Canceled) often leave both store owners and customers wanting more, especially when the fulfillment process involves multiple steps.
For stores offering custom products, B2B orders, or made-to-order services, detailed tracking is essential. That’s where Shopify Custom Order Status becomes a powerful upgrade.
In this step-by-step tutorial, you’ll learn how to add custom order statuses to your Shopify store, so you can improve customer communication, streamline your workflow, and offer a more professional order tracking experience.
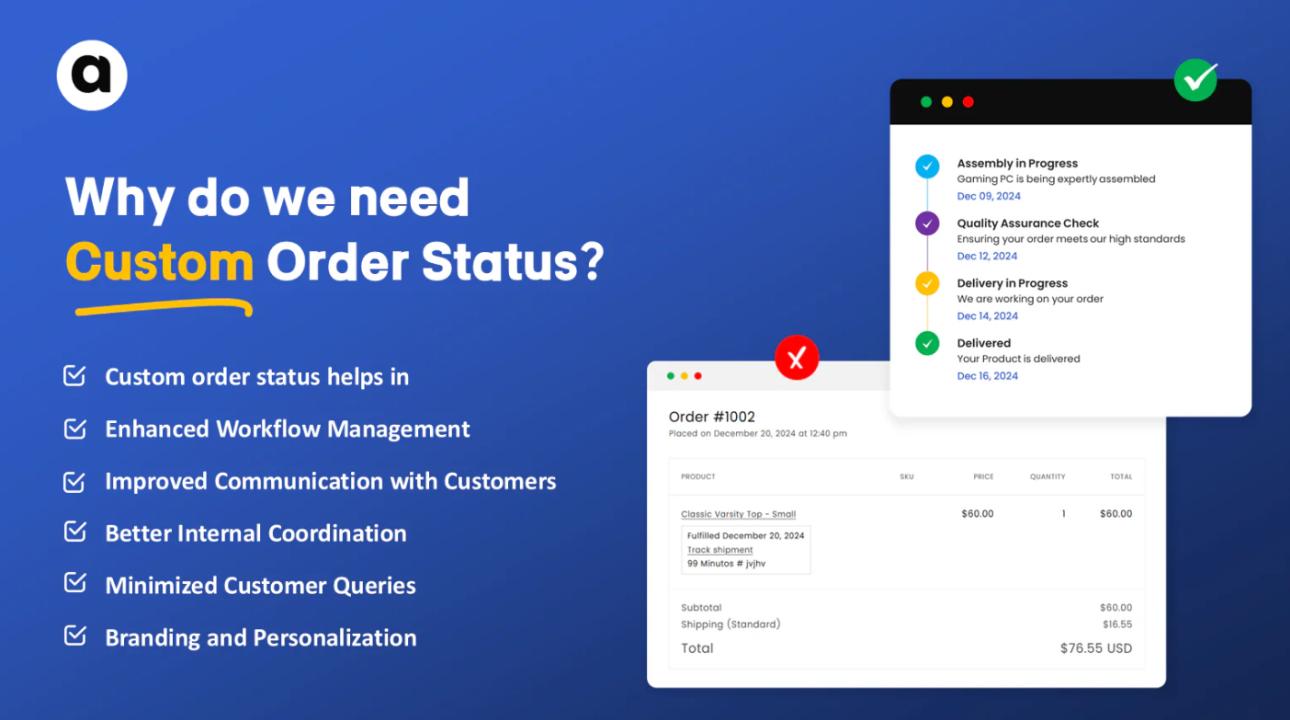
Why Use Shopify Custom Order Status?
Before we dive into the tutorial, let’s quickly recap why custom order statuses are valuable:
- Better customer experience: Customers can track their order in real time, step by step.
- Reduced support tickets: Clear order updates lead to fewer "Where’s my order?" inquiries.
- Improved internal workflow: Teams can easily track orders through each fulfillment stage.
- Perfect for custom, wholesale, and multi-step orders.
Now, let’s walk through the process of setting up custom order statuses in your Shopify store.
Step 1: Choose a Shopify Custom Order Status App
Shopify doesn’t offer built-in custom order status features. To enable this, you’ll need a third-party app like the Addify Custom Order Status App.
These apps allow you to:
- Create custom statuses
- Automate order tracking updates
- Send branded notifications
- Design a customer-friendly tracking page
Once you’ve selected your preferred app, install it from the Shopify App Store.
Step 2: Map Out Your Fulfillment Process
Before creating your custom statuses, take a moment to list the key steps in your order process.
For example:
- Order Received
- Design Approval
- Production Started
- Quality Check
- Packaging
- Shipped
- Delivered
Mapping your workflow ensures that your statuses reflect the real journey of an order in your store.
Step 3: Create Your Custom Order Statuses
Using your app’s dashboard, add your custom order statuses. Keep the names clear, simple, and customer-friendly.
Tip: Avoid internal jargon. Customers should instantly understand what each status means.
For example:
- “In Production” instead of “Stage 2 Processing”
- “Quality Check Completed” instead of “Internal Review Passed”
Step 4: Automate Customer Notifications
Set up automatic email or SMS alerts that trigger when an order changes status. This keeps your customers updated without manual effort.
Pro tip: Customize the messages to match your brand’s tone and >
Step 5: Customize Your Tracking Page
Many Shopify Custom Order Status apps allow you to create a branded order tracking page where customers can check their order status anytime.
Make sure your page:
- Matches your store’s colors and branding
- Is easy to navigate
- Provides clear step-by-step updates
Step 6: Test the Process
Before going live, place test orders and walk through each status update. Make sure:
- Customers receive notifications at the right time
- Status updates are displaying correctly
- The tracking page is working smoothly
Testing helps you catch small errors and fine-tune the experience.
Final Thoughts
Shopify Custom Order Status is one of the most effective ways to enhance your store’s professionalism and improve customer satisfaction. It’s especially valuable for custom product stores, B2B businesses, and shops with multi-stage fulfillment.
By following this tutorial, you can create a smoother, more transparent order tracking system that:
- Builds customer trust
- Reduces support workload
- Keeps your internal teams organized
A well-designed order status system can set your Shopify store apart and help you create a lasting impression with your customers.