
Preparing year-end tax documents can be overwhelming, especially when it comes to generating essential vendor forms like IRS Form 1099 and Form 1096. Whether you use QuickBooks Desktop or QuickBooks Online, printing these forms accurately is crucial to avoid IRS penalties, filing delays, or rejected submissions. This guide provides professional, practical, and clear steps to help you Print Form 1099 and 1096 in QuickBooks, along with expert tips to ensure everything is completed correctly and on time. For additional help, you can always reach support at +1(866)500-0076.
Why Printing 1099 & 1096 Forms Correctly Matters
Form 1099-NEC or 1099-MISC is used to report payments made to independent contractors and non-employees, while Form 1096 is the summary transmittal form submitted to the IRS when filing paper forms. Incorrect printing settings, outdated QuickBooks versions, or mapping mistakes can lead to inaccurate or rejected filings.
Using the right process to Print Form 1099 and 1096 in QuickBooks ensures:
- Proper vendor reporting
- Valid IRS-accepted alignment
- Accurate payment totals
- Smooth year-end compliance
If you face technical issues during printing, contact expert help at +1(866)500-0076.
Top Tips to Print IRS Form 1099 and 1096 in QuickBooks Correctly
Below are the most effective and professional tips to ensure successful printing in both QuickBooks Desktop and QuickBooks Online.
Tip 1: Update QuickBooks Before Printing
Whether you plan to Print Form 1099 and 1096 in QuickBooks Desktop or Online, always verify the software is updated:
- In QuickBooks Desktop, go to Help > Update QuickBooks Desktop > Get Updates.
- In QuickBooks Online, updates occur automatically, but check for 1099 preparation updates under Expenses > Vendors.
Updates ensure your forms match current IRS formatting and spacing so the printed data aligns properly with preprinted forms.
Tip 2: Verify Vendor Information and Eligibility
Before printing:
- Ensure vendors are marked as eligible for 1099.
- Confirm the vendor’s Tax Identification Number (TIN) is correct.
- Make sure payment types meet the IRS thresholds for reporting.
Vendor details are critical, especially when printing forms manually. Incorrect TINs or names can result in rejections.
Tip 3: Map Vendor Payment Accounts Properly
QuickBooks uses account mapping to determine which payments appear on your 1099 forms.
To avoid missing payments:
In QuickBooks Desktop:
- Go to Edit > Preferences > Tax: 1099 > Company Preferences
- Map accounts to the correct 1099 boxes (ex: nonemployee compensation → Box 1)
In QuickBooks Online:
- Navigate to Expenses > Vendors > Prepare 1099s
- Follow the step-by-step onscreen mapping tool
Correct mapping ensures accurate totals before you Print Form 1099 and 1096 in QuickBooks Desktop or Online.
Tip 4: Use Official IRS-Approved Preprinted Forms
QuickBooks does not print the red ink forms required by the IRS for mailing. Instead, it prints only the data.
Purchase these from:
- IRS.gov (free, but slow delivery)
- Office supply stores
- Online retailers
Make sure to have enough copies of:
- Form 1099-NEC/MISC Copies A, B, C
- Form 1096
Using approved forms guarantees compliance when you Print Form 1099 and 1096 in QuickBooks Online or Desktop.
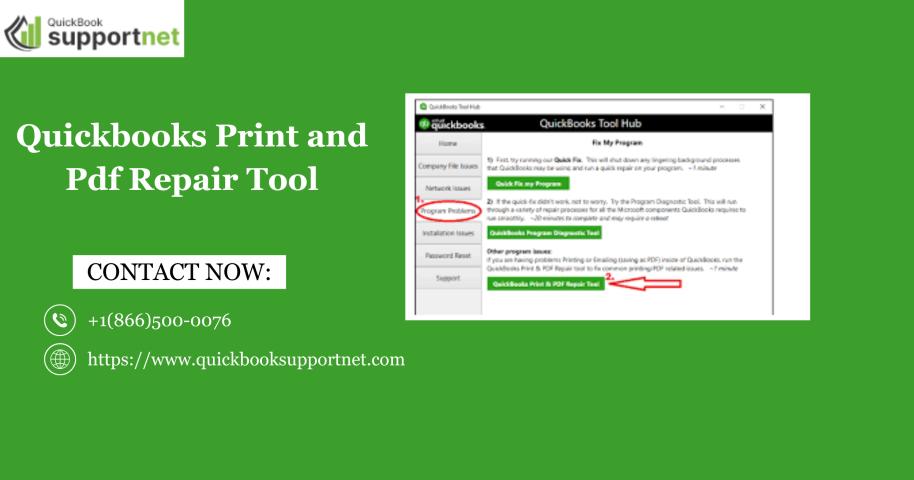
Tip 5: Adjust Printer Alignment Carefully
Misaligned data is one of the most common reasons forms get rejected.
In both versions of QuickBooks:
- Click Print Sample
- Adjust the alignment using the on-screen grid
- Test again until it matches perfectly
For manual printers, adjust:
- Paper size
- Scale settings
- Margin offsets
- Print quality settings
If alignment issues persist, reach support at +1(866)500-0076 for assistance.
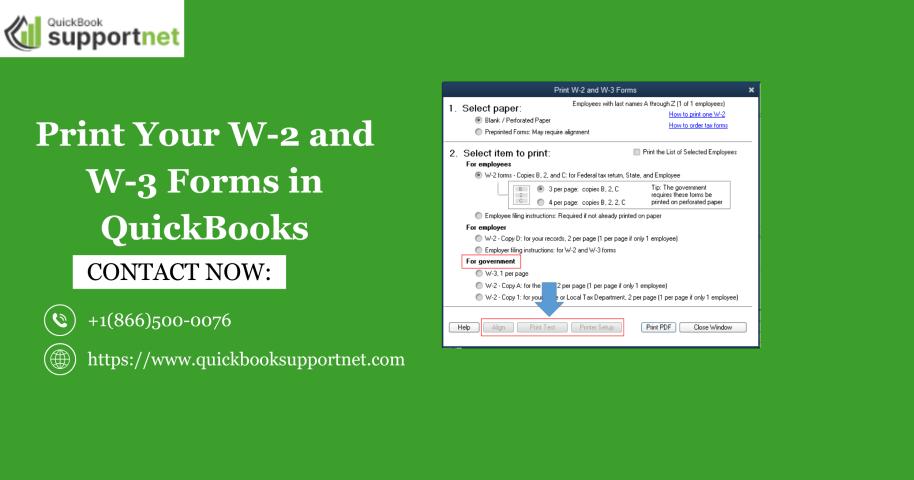
Tip 6: How to Print Form 1099 and 1096 in QuickBooks Desktop
Here is the correct process:
To Print 1099 Forms in QBDT
- Go to File > Print Forms > 1099s
- Select the correct tax year
- Review vendor totals
- Load preprinted forms
- Choose Print 1099s
To Print 1096 in QBDT
- After printing 1099s, QuickBooks prompts you to print 1096
- Insert the preprinted 1096 form
- Click Print
- Verify the alignment before final printing
This ensures your attempt to Print Form 1099 and 1096 in QuickBooks Desktop is successful the first time.
Tip 7: How to Print Form 1099 and 1096 in QuickBooks Online
QuickBooks Online has a streamlined process:
To Print 1099 Forms in QBO
- Go to Expenses > Vendors
- Select Prepare 1099s
- Complete the mapping and verification
- Choose Print and mail
- Print sample → Adjust → Print final copies
To Print 1096 in QBO
QuickBooks Online does not automatically generate Form 1096 for e-filers.
However, if you are paper-filing, QBO provides a printable 1096 after you complete the 1099 process.
This covers the full process to Print Form 1099 and 1096 in QuickBooks Online accurately.
Tip 8: Double-Check Totals and IRS Thresholds
Incorrect vendor totals cause major IRS discrepancies.
Verify:
- Total nonemployee compensation is above $600
- Rent, royalties, or legal fees are mapped to correct boxes
- Credit card or third-party processor payments are excluded (reported via 1099-K, not 1099-NEC)
Accuracy prevents penalties and IRS notices.
Tip 9: Keep a Digital and Physical Backup
Always save:
- PDF copies of all 1099s
- Scanned copies of printed 1096
- Vendor payment summaries
- IRS filing receipts
Backups help you respond quickly if the IRS requests clarification or if you misplace printed forms.
Tip 10: Contact Expert QuickBooks Help When Needed
Year-end reporting is time-sensitive. If you experience:
- Printer misalignment
- 1096 not printing
- Missing vendors in forms
- Incorrect mapping
- Error messages or crashes
You should immediately contact QuickBooks experts at +1(866)500-0076 for fast resolution.
Final Thoughts
Printing your IRS Form 1099 and Form 1096 accurately is essential for tax compliance and smooth vendor reporting. By following these top professional tips — updating software, verifying vendor data, mapping accounts, adjusting alignment, checking totals, and using the correct process for both QuickBooks Desktop and Online — you can confidently Print Form 1099 and 1096 in QuickBooks without errors.