Quick Overview
Most solar-related roof leaks trace back to how the mount was installed, not the panels themselves
Solar roof leak prevention is primarily a flashing and structural engineering problem, not a product feature
Roof type (shingle, tile, metal, membrane) determines which mounting method is safe to use
Flashing integrated beneath the roofing layer, not surface sealant, is what actually stops water
Penetration-free mounting exists for certain roof types and eliminates the leak pathway entirely
Why a Solar Installation Can Outlive a Roof or Ruin It
Two homes on the same street install identical solar arrays; after three years, one roof is dry, while the other has a water stain in the bedroom ceiling. A contractor finds a bolt hole with degraded caulk behind a panel. Same panels, same wattage, but different outcomes showing the difference was what happened at the roof surface during mounting.
Every rail-based solar system needs attachment points that transfer wind and structural loads down into the roof framing. That means creating a hole somewhere in a surface whose entire job is to keep water out. How that hole is treated determines whether you get twenty leak-free years or a ceiling repair bill within thirty-six months. This is the real engineering question behind solar roof leak prevention, and it has very little to do with panel brand or inverter choice.
What Roof Penetration Concerns Actually Involve
The attachment hardware, usually an L-foot or stanchion, has to be bolted through the roofing material into a rafter or truss, deep enough to hold real structural load. Wind uplift on an array during a storm event can put several hundred pounds of pull force on a single attachment point, so this isn't a cosmetic fastener. It has to bite into solid framing.
That requirement is exactly what creates roof penetration concerns: you need a hole strong enough to anchor a serious mechanical load, in a material engineered to shed water away from any opening. Those two goals pull in opposite directions, and reconciling them is the core design challenge every mounting manufacturer has to solve.
Early solar installations often treated this as a caulking problem: drill the hole, drop in the bolt, smear sealant around the base, done. It's a fast method, and it fails in a predictable way. UV exposure breaks down sealant polymers, the metal bolt and surrounding flashing expand and contract at different rates than the caulk during temperature swings, and within a few seasons, microscopic gaps form. Water doesn't need much of a gap to find its way in.
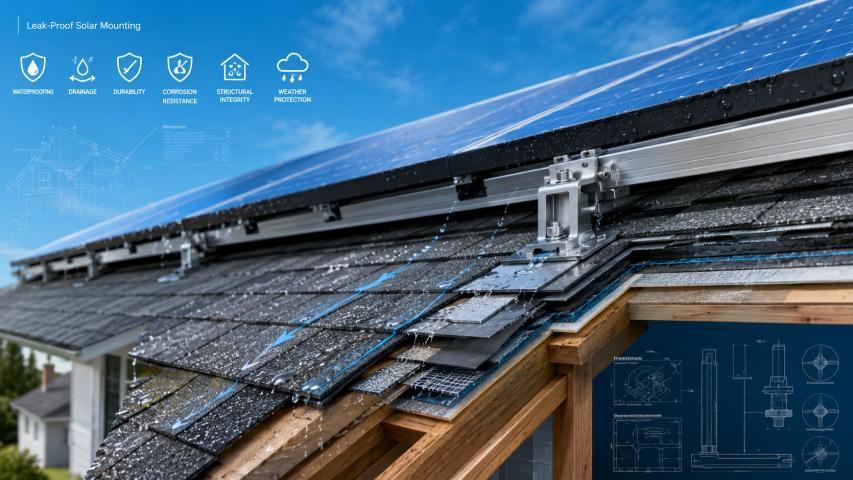
The Engineering Fix: Flashing Does the Real Work
Reliable mounting systems now treat sealant as a secondary barrier, not the main defense. The primary defense is mechanical, borrowed directly from standard roofing practice: a flashing piece inserted underneath the existing shingle or tile course, exactly the way a plumbing vent or skylight would be flashed.
The physics behind this is simple gravity management:
The flashing tucks under the shingle course above the penetration and overlaps the course below it, so water sheds over the top of the flashing and continues down the roof plane
The mounting foot bolts to the flashing rather than directly to bare decking
A weatherproof boot or gasket seals the bolt shaft where it passes through the flashing, rated for sustained UV and thermal cycling
Because the flashing is woven into the existing water-shedding layers, it behaves as part of the roof system rather than a patch sitting on top of it
That distinction- patch versus integrated layer- is what separates a leak showing up in year one from a mount that lasts as long as the shingles around it.
Different Roofs Need Different Mounting Logic
Hardware built for asphalt shingles doesn't transfer to other roofing materials, and using mismatched hardware is one of the most frequent and costly errors in residential solar work.
Asphalt shingle roofs use the flashed L-foot method described above. It's the most standardized approach in the industry because shingle installation itself is fairly uniform across regions.
Tile roofs need elevated hardware, tile hooks or replacement mounts that lift the attachment point above the tile surface so installers aren't cracking brittle tile trying to drill through it. Some systems swap out a full tile for a waterproof composite piece with the mount base built in.
Standing seam metal roofs are the simplest case structurally. Clamps grip the vertical seam mechanically, with zero penetration required. No hole, no flashing, no sealant aging over time, the seam geometry itself provides the anchor.
Low-slope membrane and corrugated metal roofs, typical on commercial buildings, often use ballasted racking. Weight, not fasteners, holds the array against wind uplift. This removes penetration risk but adds dead load, which means the roof structure has to be checked for load capacity before installation.
When Skipping Penetration Altogether Makes Sense
Ballasted systems and standing seam clamps share one advantage: they don't create a hole to manage in the first place. For flat commercial roofs, ballast trades penetration risk for added weight and typically higher material cost, since ballast blocks don't generate any electricity themselves. For standing-seam residential roofs, clamps offer the same penetration-free benefit without the weight penalty, which is part of why more homeowners are specifying standing-seam metal roofing when they know solar is coming later.
The limitation is geometry. You can't clamp onto asphalt shingles, and you generally can't ballast a steep residential roof without specialized structural engineering. Penetration-free mounting solves the leak problem completely, but only on roofs shaped to support it.
Installation Mistakes That Undermine Good Hardware
Even quality mounting hardware fails if installed incorrectly:
Skipping the flashing layer and relying on surface sealant to save labor time
Using standard fasteners instead of manufacturer-specified corrosion-resistant lag bolts
Missing the rafter, anchoring into decking alone, which weakens both the structural hold and the water seal around an oversized pilot hole
Ignoring the remaining roof lifespan, mounting a 25-year-rated system onto shingles with five years of service life left
Conclusion
A leak-free solar installation comes down to matching the mounting method to the roof, treating flashing as the actual water-shedding mechanism rather than a caulk gun, and anchoring into structural framing instead of decking. Where the roof geometry allows it, standing seam metal, flat membrane roofs, and penetration-free mounting removes the leak pathway entirely. Everywhere else, integrated flashing installed to the same standard as any other roof penetration is what keeps a solar array from becoming a roofing liability.
Frequently Asked Questions
Do solar panels cause roof leaks?
Not inherently. Leaks come from poorly sealed or unflashed mounting penetrations, not from the panels or racking itself.
How long does solar mounting flashing typically last?
When properly integrated into the roofing layer, flashing generally matches the service life of the surrounding roofing material.
Can solar be installed without penetrating the roof?
Yes, standing seam metal roofs support seam clamps, and flat roofs support ballasted racking, both without drilling.
Who covers repair costs if a solar mount causes a leak?
This depends on the installer's workmanship warranty and whether the roofing manufacturer's warranty was voided by the penetration method used, so contract terms matter.
Should a roof be replaced before adding solar panels?
If the roof has less than about 10 years of remaining life, most installers recommend replacing it first to avoid removing and reinstalling the array later.